
AutoCAD MEP and AutoCAD Architecture use tool palettes differently than normal AutoCAD and the path setting in Options under the Files tab was designed only for use with the AutoCAD tool palettes. This path needs to remain as set by the system in AutoCAD MEP. Changing this path can result in problems. To share tool palettes among multiple users, you need to use the content browser to create shared tool palettes.
Concepts
Understanding a Tool Palette:
An individual tool palette contains the tools (buttons) that are displayed on a palette within ABS. The source file (*.atc) for an individual palette contains the following items:
Understanding a Tool Palette:
An individual tool palette contains the tools (buttons) that are displayed on a palette within ABS. The source file (*.atc) for an individual palette contains the following items:
- The name and command that is executed when a tool is selected.
- The path to any necessary support files required for the tool to function.
- Any settings specific to the type of tool. For instance, layer keys, overrides, and insertion behavior.
Right-click on different tools and look at the Properties for further tool properties.
Other items such as tool icons and source blocks are located in other locations and referenced as mentioned above.
Understanding a Tool Palette Library:
A library of tool palettes consists of multiple tool palettes contained in one folder located on either a local machine or a network. The support files to allow the tools in different tool palettes to function can be located in different places, as long as the paths are correct within each ATC file.
The library represents the tool palettes that can be used in a given ABS workspace. The actual organization of the palettes into groups is not contained in the library. These settings are maintained by the current ABS profile. The profile defines what palettes are available and in what groups they are placed.
Understanding a Tool Catalog:
A tool catalog is a library of tools and tool palettes that can be imported into the workspace or shared among other users. The actual tool catalog file keeps track of the locations of the items it contains, as well as the organization of these items.
Procedures
Preparing a Tool Palette Library for Deployment:
The CAD Manager or other managing user should configure the tool palettes as desired locally on their machine. This can include; creating new palettes that contain custom tools, moving tools from one palette to another for organizational purposes, redefining the settings for a given tool, adding tools for custom content, among other things.
The end result of this process should be that the tool palettes on the manager’s machine contain all the tools desired, and the tools are organized on the palettes.
Creating a New Tool Catalog in the Content Browser:
Content Browser will be your method for publishing and deploying tool palettes in a network environment. You will create a tool catalog that contains your tool palettes, publish that tool catalog to the network, and deploy it to users in the CAD environment. To create the tool catalog in Content Browser, complete the following steps.
- Open the Content Browser (AecContentBrowser in the command line).
- Create a new tool catalog by clicking on the create new catalog icon in the bottom left corner of the window ..
- You want to select the “Create a new catalog” option and name the catalog. You can choose to place the new catalog in any location. I would suggest the default location, as it will be easier to find this “source” tool catalog for later modifications.
- The tool catalog will be published to the network later in the process, so there’s no need to have this version on the network.
- If you would like your tool palettes to be grouped into categories when you deploy the tool catalog, you need to create a category for each group in your tool catalog. To create a new category, for example “HVAC Equipment”, right-click in the catalog and choose Add Category or click on the Add New Category icon in the bottom left corner.
- Categories are useful to organize your palettes into groups for organizational purposes. They also allow you to deploy a group of palettes into a new machine instead of one-by-one.
- You now need to transfer your tool palettes to the new tool catalog in Content Browser. With the correct category in your new tool catalog open in content browser, click-and-drag each of the tool palette tabs into content browser.

The tool catalog should now be populated with the tool palettes that you wish to deploy in the CAD environment. If you inadvertently place a tool palette in the wrong category, you can cut and- paste it into the correct category.
Publishing Your New Tool Catalog:
With your new tool catalog populated and organized properly, you’re ready to publish the catalog to the network for deployment.
To publish the catalog, complete the following steps.
- In the Home view of content browser, right-click on the new tool catalog you’ve created and select Publish ‘Your Catalog Name’.
- Choose to copy the catalog to another location. This allows you to place the catalog on your network, while leaving the original catalog on your local machine. Choose Next.
- Choose the network location you’d like to use for sharing of this catalog and the tool palettes contained within. Choose Next.
- You will now be prompted to set the path of all the support files needed for the catalog. Make sure the box for “Automatically copy tool dependent files into the above folder to be referenced by the published catalog” is checked. Choose a content directory of your choice. Choose Next.
- As explained in the concepts section of this document, there are support files that are needed in order for tool palettes to function properly. The process of publishing rewrites the paths for these support files to a location of your choice. The support files themselves are also copied to this location. This allows for the tool catalog to function by itself on the network.
- You now set the path that users will utilize to locate the tool catalog on the network. Both a UNC path and a mapped drive can be used. Make sure that the read-only box is checked. Also make sure that the “Set items not to be refreshable when drag/dropped into the workspace” is unchecked. Select Finish.
- Setting items as read-only prevents users from modifying the tool catalog on the network. This is helpful when manager seeks to control the CAD environment.
- Navigate to the tool catalog location on your network and set the master ATC file (yourcatalogname.atc) to read-only. This will prevent users from modifying the master file. In the previous step you set the files contained in the tool catalog to read-only. The tool catalog containing your tool palettes has now been published to the network. The support files for those palettes to function have also been placed on the network, and the paths to locate them have been rewritten. At this point your tool palettes are can function on their own and need to be added to the users’ Content Browser Libraries.
Deploying the Tool Catalog to Users’ Content Browser Library:
There are two different methods for deploying your new tool catalog to users’ content browser. The first is a manual addition.
To complete a manual addition, follow these steps:
- Open content browser on a user’s machine.
- Choose to add a new catalog.
- Choose to add an existing catalog and browse to the network location where you published your tool catalog. Select the master catalog file (yourcatalogname.atc).
The second method is to create a registry install file. To complete this process, follow these steps:
- Open content browser on the manager’s machine. Select your published catalog.
- You can confirm that a tool catalog is located on the network by checking the path to its location, which is located its properties.
- Hold the Shift key and right-click on the published catalog. Choose the “Convert to Registry File” option.
- Name the registry install file and place it in a network location that other users can access.
- Using the appropriate method for your network, run the registry key on users’ machines. The published tool catalog, and all the tool palettes contained within, has been added to the users’ content browsers.

Adding Tool Palettes to the Users’ Workspace:
Even though the tool catalog has been added to the content browser, the tool palettes it contains have not been added to the tool palette library for the workspace. To do this, complete the following:
- Open content browser and navigate to the networked tool catalog.
- Find the tool palette that you want to add to the workspace. Move your cursor over the i-drop icon and then drag-and-drop the tool palettes anywhere in the workspace.
- The tool palettes are linked back to the original network location. You’ll notice that there’s a small icon in the bottom right corner of the tool palette. If the user clicks on this icon the tool palette will be updated according to the published tool catalog.
This should import the tool palette from the network tool catalog. Now the user has a tool palette that’s automatically refreshed each time the program is loaded.
Configuring Tool Palettes in Users’ Machines:
You’ve now imported the tool palettes from the network into the program tool palette library. You need to set the tool palette grouping now using profiles. Remember, tool palette grouping is controlled by profiles.
As part of your management of the CAD environment, you’ve most likely created a profile that sets the various paths and settings that you would like to be active on users’ machines. Activate this profile and organize the tool palettes into groups as desired. If you’ve used categories in your Tool Catalog, then the palette grouping was added to current profile at the time of importing the tool palettes.
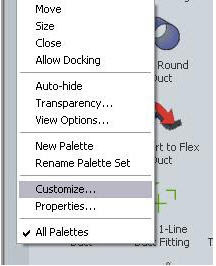
To customize the groups, you need to select the Customize option when you right-click on the tool palette border.
When you’ve set the groups to the desired grouping, export the profile for use by the users.
Deploying User Profile:
The link that’s used to start ABS or ADT contains a p-switch, “/p”, followed by the name of a profile to load at startup. This p-switch can be followed by a path to a network location as well. Place the exported file on your network and modify the program shortcut to point towards this ARG file. This allows for easy deployment of future changes to the profile, since the manager simply has to replace the ARG file on the network.
End Result
Using the procedures outlined by this guide, you should be able to organize and deploy tool palettes and profiles to groups of users.
Configuring Tool Palettes in Users’ Machines:
You’ve now imported the tool palettes from the network into the program tool palette library. You need to set the tool palette grouping now using profiles. Remember, tool palette grouping is controlled by profiles.
As part of your management of the CAD environment, you’ve most likely created a profile that sets the various paths and settings that you would like to be active on users’ machines. Activate this profile and organize the tool palettes into groups as desired. If you’ve used categories in your Tool Catalog, then the palette grouping was added to current profile at the time of importing the tool palettes.
To customize the groups, you need to select the Customize option when you right-click on the tool palette border.

When you’ve set the groups to the desired grouping, export the profile for use by the users.
Deploying User Profile:
The link that’s used to start ABS or ADT contains a p-switch, “/p”, followed by the name of a profile to load at startup. This p-switch can be followed by a path to a network location as well. Place the exported file on your network and modify the program shortcut to point towards this ARG file. This allows for easy deployment of future changes to the profile, since the manager simply has to replace the ARG file on the network.
End Result
Using the procedures outlined by this guide, you should be able to organize and deploy tool palettes and profiles to groups of users.


I have a question that is really puzzeling me. Our company runs AutoCAD 2008 and AutoCAD MEP 2008. We have developed network tool palettes along with groups within AutoCAD that we would like our MEP users to use when they use the classic ACAD arg under MEP. The paths can be added to the options but we are not able to import any of the groups. Should we take a different approach to the tool palettes under MEP in order to get the correct tool palette groups to show up. Thanks for great information on your blog.
ReplyDeleteIf you have created AutoCAD Groups for your palettes, they should be in your network Library (cbl file). Hopefully your AutoCAD groups are in a Palette Set where you can drag that set from the content browser to the users tool palette. The best way to control what group of tools is used in MEP is through using a workspace and not a profile. Create one workspace inside of MEP called AutoCAD Classic, and create it when you have the AutoCAD Palettes up. Then users can switch their workspace to either the Electrical, HVAC, Plumbing, etc to get the other palettes.
ReplyDeleteAlso make sure that you DO NOT have a project current in the Project Navigator when you are creating network tool palettes, network palette sets, or network content library.
ReplyDeleteIf a project is current, those network palettes will come up for that project. If you switch projects, the palettes will change.
So make sure the project navigator project is set to none before you start.
When I start up AutoCAD MEP 2008, the tool palettes toolbar opens as well. I would like to remove the toolbar from the startup options. Any suggestions?
ReplyDeleteNot sure if you are talking about a palette or a tool bar, but their visability is controlled by the "Workspace". If you close any palette or tool bar, and save the workspace, the next time you open AutoCAD MEP, those tools will not be there.
ReplyDeleteI am fairly new to the tool palettes, but I have read a lot of articles. I have been trying to set up our company's standard tool palettes, but in case I need to modify/add new tools to the palettes, I want the palettes to be dynamically updated on each user's machine. I should mention, I also want to lock the palettes in order to prevent other user's from messing up the files.
ReplyDeleteFrom what I understood, there are two ways of copying the tool palettes to other user's computers. The first method is the way you explained above. The second is, once the original content browser is copied in a network location, AutoCad Architecture automatically creates atc files. Under each users' options tab, if you add that specific network location as another "tool palette file location", you will automatically see all the tool palettes that are associated with those atc files.
My question to you would be, which method do you recommend? With your method, users will simply refresh the palettes should there is any changes to any of the palettes. But with the second method, if/when a new palette is created, the new palette will be added to other users' palette tab without having to drag&drop it from the content browser.
I hope I am being clear, as I tried to explain this to the best of my poor English abilities.
Hi Scott. I just installed MEP 2012 and am stuck on step 7 of Creating a New Tool Catalog in the Content Browser. Another person in my company previously created some palettes in AutoCad 2012 (not MEP) and I have xtb files. I can't seem to figure out how to import the xtb files into ACad MEP so I can drag and drop them into the content browser.
ReplyDeleteThanks for your help.